Puppet Configuration on Azure VM (Part-I)

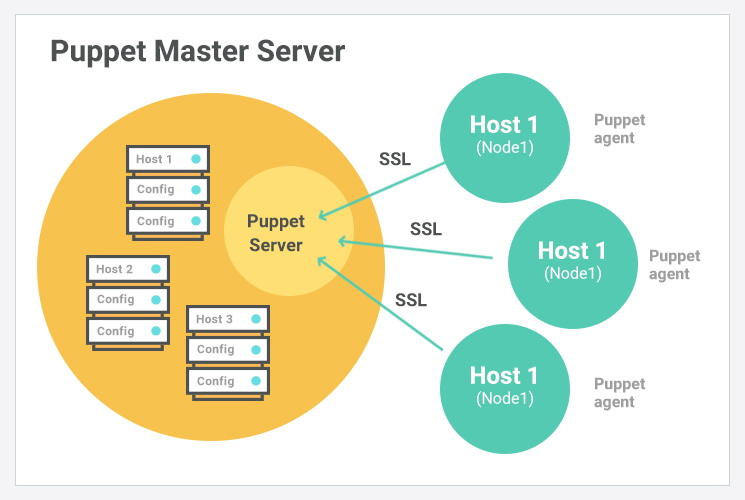
In this blog, I will deploy the Puppet on Azure virtual machine. First thing you have to do is take a look on my this blog to know, how to create a virtual on Azure using command line. And then If Puppet is new for you, read my this blog first.


Create a virtual machine for Puppet master using following command:

az vm create --resource-group halcyoona-group --name master --image UbuntuLTS --generate-ssh-keys --output json --verbose

you will get this output:

Use existing SSH public key file: /home/halcyoona/.ssh/id_rsa.pub
{- Finished ..
  "fqdns": "",
  "id": "/subscriptions/95623de4-e1df-4c06-9954-bd66314b4bd0/resourceGroups/halcyoona-group/providers/Microsoft.Compute/virtualMachines/master",
  "location": "eastus",
  "macAddress": "00-22-48-20-91-D8",
  "powerState": "VM running",
  "privateIpAddress": "10.0.0.5",
  "publicIpAddress": "13.72.73.153",
  "resourceGroup": "halcyoona-group",
  "zones": ""
}

Now using publicIpAddress, ssh into your master using below command:

ssh halcyoona@13.72.73.153

Now add the repository of the Puppet.

wget https://apt.puppetlabs.com/puppet6-release-bionic.deb
sudo dpkg -i puppet6-release-bionic.deb
sudo apt update

Now install the Puppet Server in the Puppet master virtual machine:

sudo apt-get install puppetserver

Now we create our own CA with uisng following command:

/opt/puppetlabs/bin/puppetserver ca setup

Output:

Read More »

Puppet For Beginners

In this blog, I will discuss Puppet architecture at the very basic level in a very simple way.

Consider a system administrator working with multiple servers. If one of the servers has an issue, they can easily fix it. The situation becomes problematic, however, when multiple servers are down.
This is where Puppet can help.
With Puppet, you can write simple code and deploy it to the servers that have issues. After the code runs, all servers are rolled back to their previous working states or set to the new desired states in a matter of seconds. Puppet can also be used to deploy software and add security, all through simple codes.

What is Puppet?

Puppet is a configuration management tool ensuring that all systems are configured to a desired and predictable state.
Puppet is an open-source DevOps system management tool. It is used to centralize and automate the configuration management procedure. This tool is developed using Ruby DSL (domain-specific language). Puppet tool deploys, configures, and manages the servers.

Architecture

Read More »

Establish Connection between MySQL and Apache in a Containerized Web Application

This blog is the continuation of the previous blog of build a Containerized Web Application on Azure (Click here to read the previous blog) . In this blog, we will establish a connection between mysql-container and apache-container.

Now watch those containers with this command:

watch 'sudo docker ps -a'

If mysql-container stops then restart it using following command:

sudo docker start mysql-container

Open the mysql-container shell using the following command and check the status of the mySQL service.

sudo docker exec -it mysql-container bash
service mysql status

If MySQL service is not running then start it using the following command:

service mysql start

We have installed the network tools in the apache-container. Now install the network tools in the mysql-container.

apt install inetutils-ping net-tools -y

Checking Connection

Check network cards in the mysql-container.

ifconfig

And note down the IPaddress of the mysql-container and exit from this container and move to host machine. In my case, It is 172.17.0.2.

Read More »

Build a Containerized Web Application on Azure

In this blog, I am going to setup MySQL server in one container and apache2 in other container and If you are not familiar with Docker, read my this blog first(Click here to read the blog). Moreover, this all will be done on Azure virtual machine, If you are not familiar with Azure virtual machine, please read my this blog first to create the virtual machine on Azure(Click here to read the blog).

Setting Up Docker

To install Docker, use the following command:

sudo apt install docker.io

To start docker, command is given below:

sudo systemctl start docker

To start docker, when you start the ubuntu use this command:

sudo systemctl enable docker

To view current images, use the following command:

sudo docker images

To pull images, use the following command:

sudo docker pull ubuntu

Creating MySQL Container

We have already downloaded the ubuntu images. Now using this ubuntu image we will create the container and named it mysql-container. Because we are going to install MySQL database in it.

sudo docker run --name mysql-container -it ubuntu

Now you are in mysql-container, execute the following comand to set the environment and install the vim for editing.

apt update
apt install vim -y
exit

If you want to see which container in running on your host machine use this command:

Read More »

Flask Website Deployment using Docker Compose on Azure Cloud

In this blog, I will deploy FLASK app on nginx using Docker Compose. If you don’t have any idea how Docker Compose works, read my previous blog first (Click here to read the previous blog).
Before we move to work, I will give you brief intro the things which I am going to use. I created a virtual machine on Azure Cloud Platform. If you don’t know, how to create virtual machine on Azure, go to my this blog create virtual machine easily with few simple steps (Click here to read the blog).
After creating virtual machine just ssh into your machine using simple command.

ssh halcyoona@40.114.31.5

Installation

To install Docker the in your virtual machine, type the command in terminal and press enter:

sudo apt install docker.io
sudo apt install docker-compose

Create a directory with the name of your app, like I am creating my_flask_app.

mkdir my_flask_app
cd my_flask_app

In this floder create two more directory with the nginx and flask. Nginx is entry point of the app, where we get request and then we redirect those request to flask app.

mkdir flask
mkdir nginx

Flask App Setting

Now move into flask directory and create python virtual environment but first install package that is required to create the virtual environment i.e venv first then create virtual environment using following command:

cd flask
sudo apt install python3-venv
python3 -m venv env

Now activate the environment with the simple command:

soure env/bin/activate

And then install flask and uwsgi.

pip install flask uwsgi

flask package is used to create the applications.
uwsgi is a Web Server Gateway Interface used to communicate to nginx server.

Read More »

Getting Started With Docker Compose

In this blog, I will discuss Docker Compose and basic workflow of Docker Compose. But if you don’t know any thing about Docker technology read my blog about Docker first.

Docker Compose, a tool for defining and running complex applications with Docker. With Compose, you define a multi-container application in a single file, then spin your application up in a single command which does everything that needs to be done to get it running.Docker Compose is mostly used as a helper when you want to start multiple Docker containers and don’t want to start each one separately using docker run. Docker Compose allows configuring and starting multiple Docker containers. All of that can be done by Docker Compose in the scope of a single host.

Docker Compose Workflow

There are three steps to using Docker Compose:

  • Define each service in a Dockerfile and this will create a container for this service.
  • Define the services and their relation to each other in the docker-compose.yml file. And how they are going to communicate to each other, all the rules are defined in this file.
  • Use docker-compose up to start the system. You have to use only this command to start the whole system.

Fast Update

When you change some file in one service i.e update the code or any other changes, you have to restart the docker-compose to reflect the changes but the important things is that, only those containers are going to build again whcih are updated. Compose re-uses the existing containers. Re-using containers means that you can make changes to your environment very quickly.

If you want to deploy a website using Docker Compose check out my blog on deployment (Click here to go to deployment blog).

Creating VM on Azure Cloud using CLI, Creating a User and Running Task in Background

In this blog, I am going to show the process of installation of Azure CLI tool and then using this tool to create a ubuntu virtual machine and then accessing this virtual machine through ssh and then add one user and then adding their private key and running one job in their environment.

The first thing you need is the tools that are required. The first tool you required is Azure CLI . You can install Azure CLI simple using the following command:

sudo apt install azure-cli

To use the Azure CLI tool you need first to login into your account through terminal. For this purpose use following command:

az login

When you enter this you will be redirected to the browser, there you can enter your login detail. When you entered then you will get this type of message on your terminal.

You have logged in. Now let us find all the subscriptions to which you have access...
The following tenants require Multi-Factor Authentication (MFA). Use 'az login --tenant TENANT_ID' to explicitly login to a tenant.
b76df79f-0110-465c-90f3-07df4642315d
[
  {
    "cloudName": "AzureCloud",
    "homeTenantId": "4ea778976d-32bd-7f5f-aaa5-084cb61a0b0f",
    "id": "37623de4-e2df-4d06-8754-bd88314b4bd0",
    "isDefault": true,
    "managedByTenants": [],
    "name": "Azure for Students",
    "state": "Enabled",
    "tenantId": "5ea9899d-30bd-4f6f-aaa5-084cb61a0b0f",
    "user": {
      "name": "halcyoona@gmail.com",
      "type": "user"
    }
  }
]

Now you are logged in and you can use the Azure CLI tool to create resources from CLI.

az group create --name halcyoona-group --location eastus

When you execute above command you get following output:

{
  "id": "/subscriptions/95623de4-e1df-4c06-9954-bd66314b4bd0/resourceGroups/halcyoona-group",
  "location": "eastus",
  "managedBy": null,
  "name": "halcyoona-group",
  "properties": {
    "provisioningState": "Succeeded"
  },
  "tags": null,
  "type": "Microsoft.Resources/resourceGroups"
}

In Azure, all resources are allocated in a resource management group. Resource groups provide logical groupings of resources that make them easier to work with as a collection.
You have to set the name of the resource and then location. Now the resource group is set then move to next creating a virtual machine with this resource.

From now We look forward to creating a virtual machine using the Azure CLI. Use following command to create virtual machine.

az vm create --resource-group halcyoona-group --name halcyoonaVM --image UbuntuLTS --generate-ssh-keys --output json --verbose

In this you have to set the name of the virtual machine. Second Image you want in your machine. Generate ssh key to access it without password using your private key and if you do not specify key name, it will create a key in ~/.ssh/id_rsa.pub by default. Output will be in json form.

Read More »

Creating VM on Azure

In this blog, I am going to discuss how to create a Virtual machine on the Azure platform. A thing that is required as a prior condition is your account on the Azure platform.

When you log in to your account you have this kind of home page.

Just click on the create resource button then you will find all the resource that you can create but we are just creating virtual machine so just focusing on our goal.

Look, you can create a window virtual machine and Ubuntu but I am creating Ubuntu (If you want to create windows virtual, steps are the same). So, just click on the Ubuntu server then the following screen will be shown:

Select your resource group and name your virtual machine just like I named my virtual machine halcyoonaVM. Select your region in which you want to create your virtual machine (it’s good if you create a virtual machine to your closet region ). Then select your Image. After scrolling some more option will be shown on screen:

If you click on the change size then the following screen will be shown:

Select your machine according to your requirement and you will get back to our previous screen.
Create your SSH key pair and add your public key here. Then you will access your virtual machine using ssh (If you don’t know about SSH click here).

Now select the ports you want to make them open and click on the next disks. This screen will be shown:

Read More »

Chef Introduction

In this blog, I will tell you about chef, component of chef needed for working and detail of chef working environment. In next blog, I will show you installation of chef and working of chef.

Intro

Chef-Logo.png

Chef is an automation tool that provides a way to define infrastructure as code. Infrastructure as code simply means that managing infrastructure by writing code rather than using manual processes. Configuration management is all about trying to ensure that the files and software you are expecting to be on a machine are present, configured correctly, and working as intended.
When you have only a single machine this is fairly simple. When you have five or ten servers, it is still possible to do this manually, but it may take all day. However, when your infrastructure scales up into the thousands we need a better way of doing things.
Chef uses a pure-Ruby, domain-specific language (DSL) for writing system configurations.
Below are the types of automation done by Chef, irrespective of the size of infrastructure:

  • Infrastructure configuration
  • Application deployment
  • Configurations are managed across your network

Read More »

Guide to Establish Connection with S3 using Python Scripts

We will take a look at using Python Scripts to interact with infrastructure provided by Amazon Web Services(AWS).
In this tutorial, We are considering only Python scripting for S3.

First thing, You have to check python is installed in your machine by typing simple command:

which python

That will show you the path of python executable. If python is not installed in your machine first download it from this site: https://www.python.org/downloads/

After this check the version of python by typing:

python -V

We are using python 2.7.12 and you can use python 2.6 or higher.

Next thing you have to check pip is intall in your machine by typing command:

 which pip

That will show you the path of pip executable.If pip is not installed in your machine first download it from this site: https://pip.pypa.io/en/stable/installing/

Your version of pip should be 9.0.1 or newer.Check your version of pip by typing :

pip -V

Install boto3  and AWS CLI

Now basic installation is completed. Now install the library of python which is used to interact with AWS on by using this command

pip install awscli boto3 -U --ignore-installed six

Now login to your AWS account and select IAM.

Screenshot from 2018-07-16 13-08-51

This window will come on your screen.Read More »