Reinforcement learning: Markov Decision Process

In the previous blog, we learned basic terminologies used in reinforcement learning, now we are going to see the basic mathematics and rules behind reinforcement learning i.e MDP.

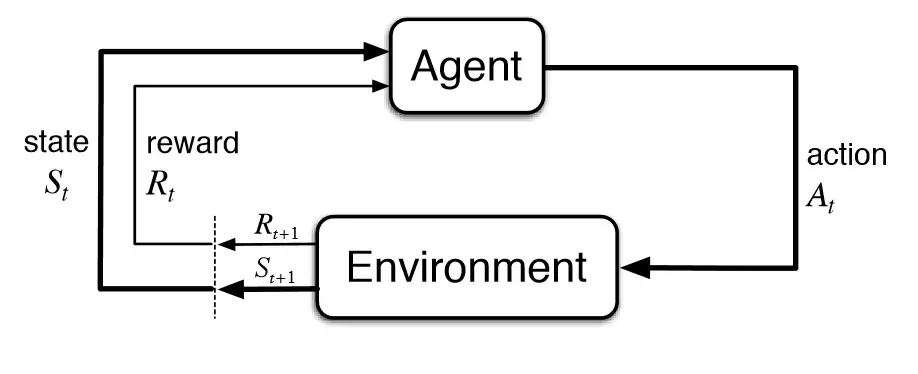
Markov Decision Processes (MDPs) are mathematical frameworks for modeling decision-making problems in which an agent takes actions to maximize a reward signal, that is where MDP is connected with reinforcement learning because in reinforcement learning we also want to maximize the reward. In this blog post, we’ll take a closer look at what MDPs are, how they are constructed, and how they can be solved. But before going toward MDP need to see the fundamentals of MDP i.e Markov Property and Markov Chain, on which we are building MDP.

Markov Property

The Markov property is a fundamental concept in Markov Decision Processes (MDPs). It states that the future is independent of the past given the present. In other words, the future state of a system depends only on the current state and the actions taken, and not on any previous states or actions.

Formally, the Markov property can be expressed as follows:

For any state s and any time step t, the probability distribution over future states, given the history of states and actions up to t, is equal to the probability distribution over states at time t+1, given only the state at time t.

This property makes MDPs well-suited for modeling decision-making problems where the future is uncertain, but the uncertainty can be reduced by taking action and observing the results.

The Markov property is a key requirement for MDPs because it allows us to model the decision-making process in a way that is computationally tractable. By assuming the Markov property, we can simplify the problem of finding an optimal policy by considering only the current state and the immediate rewards and transitions, rather than the entire history of the system. This allows us to use algorithms like value iteration, and policy iteration to solve the MDP efficiently. Now we will take a look at Markov Chain.

Read More »

Reinforcement learning

Reinforcement learning For Absolute Beginners

This blog is the continuation of the Machine Learning blog series for Absolute beginners. In the previous blog, we give a brief introduction to the three categories of machine learning. Now we will dive deep into one category of Machine learning i.e Reinforcement Learning.

Let’s start with a basic introduction to Reinforcement Learning which basically helps an agent to learn in an interactive environment by trial and error using feedback from its own actions and experiences. The agent takes some action in a particular situation in the environment. And that action may or may not affect the state of the environment. But the environment in return gives a reward that may be positive or may be negative depending on the performed action on the environment.

In Reinforcement Learning, the agent learns automatically using feedback without any labeled data, unlike supervised learning. Since there is no labeled data, so the agent is bound to learn by its experience only. The agent interacts with the environment and explores it by itself. The primary goal of an agent in reinforcement learning is to improve performance by getting the maximum positive rewards. Let’s discuss one example.

Example: Suppose there is an AI agent present within a maze environment, and his goal is to find the diamond. The agent interacts with the environment by performing some actions, and based on those actions, the state of the agent gets changed, and it also receives a reward or penalty as feedback.

In the above example, we discuss that an AI agent performs one action and will collect the negative or positive reward. And similarly, the AI agent performs the second action and will get the second negative or positive reward but that is not the case all the time. Sometimes in Reinforcement learning, the reward comes late. Let’s discuss another example.

Example: We will take an example of an AI agent driving a vehicle and it hits another vehicle by accident. AI agent’s vehicle is moving at 100 km/h in a city. And just before hitting another vehicle AI agent applied a brake. So, his last action before an accident is applying a brake. So, If we give a negative reward for the action of applying the brake, then the AI agent learns that applying a brake is not a good action, because after applying the brake, we had an accident. So, the Conclusion will be applying a brake is the cause of the accident, but the actual reason for the accident is overspeeding. So, accelerating the speed is one action but the reward of this action comes later after taking another action. So, the agent should be able to learn that driving fast is not a good habit. So, the actual problem in reinforcement learning is dealing with a reward function. How to design the reward function is the real challenge? we will discuss later, how we resolved that issue. But first, we need to understand the basic terminologies used in reinforcement learning.

Read More »

Machine Learning For Absolute Beginners

In this blog, we will talk about Machine Learning, and types of Machine Learning.

Let’s start with the Machine Learning, We human are too lazy, we don’t want to do work, so we come up with the solution and we transfer our work to machine. And we have seen that machine have done it quite well with accuracy and speed. But machine do what we tell to do, that is what human needed much so far. But we are not satisfied with work because machine don’t have intelligence. So, machine can not do intelligent work. We can not tell machine to work intelligently because machine don’t understand the term intelligent So, First we have to define the term intelligent then we can transfer the work to machine that need intelligence. that’s a problem human can not be able transfer intelligent work to machine without defining the term intelligent to machine i.e what kind of intelligence is involved in particular work.

What is intelligence?

First we will understand the term intelligence, what does intelligence means, we human take information from the surrounding environment using five sense and process that information in mind and then trying to interpret this information to make some rules. On the basis of these rules, we make decision when we get into similar environment. If we make wrong decision then people will definitely say that you are not doing your work intelligently. Actually you didn’t process the information correctly and as a result your rules may be not good to make a decision. Suppose if there is raining, what will happened before raining, there is cloudy weather, humidity is 20, air pressure is 5, because of these reason it is raining now. And we make the rule i.e if weather cloudy equals to true, air pressure > 5 and humidity > 20 then it will rain. If next day it is not raining but conditions are humidity = 30, air pressure = 6 and weather is cloudy. But accordingly to the rule it should be raining. What happened? May be this rule is not good enough to make decision, may be we didn’t process the information correctly and may be we miss some other factors that is necessary to make a decision that should be any other factor. We have to find that factor and get the information and make rule in considering additional factor also. So that our error should be become neglectable.

Read More »

Setting Virtual Environment For Atari Games and Running Airstriker Genesis using gym-retro

In this blog, I will set up a virtual environment using pip, It is always better to make a virtual environment in order to perform some machine learning or reinforcement learning or any other task which depends upon different library version. You can also create a virtual environment using Anaconda but in this blog, I will go with the virtual environment created using pip. The rest of the steps will be the same.

The first thing you have to do is to install the package that will be used to create the virtual environment

pip install virtualenv

Next is to create a virtual environment using pip with the following command:

virtualenv striker
source ./striker/bin/activate

Now the virtual environment is activated. Next, install important libraries to run the retro.

pip install tensorflow
pip install retro

Next run the Airstriker-Genesis game with the sample actions.

import retro

def main():
    env = retro.make(game='Airstriker-Genesis')
    obs = env.reset()
    while True:
        obs, rew, done, info = env.step(env.action_space.sample())
        env.render()
        if done:
            obs = env.reset()
    env.close()


if __name__ == "__main__":
    main()

When you run this code you will get this error.

Read More »

Puppet Configuration on Azure VM (Part-I)

In this blog, I will deploy the Puppet on Azure virtual machine. First thing you have to do is take a look on my this blog to know, how to create a virtual on Azure using command line. And then If Puppet is new for you, read my this blog first.


Create a virtual machine for Puppet master using following command:

az vm create --resource-group halcyoona-group --name master --image UbuntuLTS --generate-ssh-keys --output json --verbose

you will get this output:

Use existing SSH public key file: /home/halcyoona/.ssh/id_rsa.pub
{- Finished ..
  "fqdns": "",
  "id": "/subscriptions/95623de4-e1df-4c06-9954-bd66314b4bd0/resourceGroups/halcyoona-group/providers/Microsoft.Compute/virtualMachines/master",
  "location": "eastus",
  "macAddress": "00-22-48-20-91-D8",
  "powerState": "VM running",
  "privateIpAddress": "10.0.0.5",
  "publicIpAddress": "13.72.73.153",
  "resourceGroup": "halcyoona-group",
  "zones": ""
}

Now using publicIpAddress, ssh into your master using below command:

ssh halcyoona@13.72.73.153

Now add the repository of the Puppet.

wget https://apt.puppetlabs.com/puppet6-release-bionic.deb
sudo dpkg -i puppet6-release-bionic.deb
sudo apt update

Now install the Puppet Server in the Puppet master virtual machine:

sudo apt-get install puppetserver

Now we create our own CA with uisng following command:

/opt/puppetlabs/bin/puppetserver ca setup

Output:

Read More »

Puppet For Beginners

In this blog, I will discuss Puppet architecture at the very basic level in a very simple way.

Consider a system administrator working with multiple servers. If one of the servers has an issue, they can easily fix it. The situation becomes problematic, however, when multiple servers are down.
This is where Puppet can help.
With Puppet, you can write simple code and deploy it to the servers that have issues. After the code runs, all servers are rolled back to their previous working states or set to the new desired states in a matter of seconds. Puppet can also be used to deploy software and add security, all through simple codes.

What is Puppet?

Puppet is a configuration management tool ensuring that all systems are configured to a desired and predictable state.
Puppet is an open-source DevOps system management tool. It is used to centralize and automate the configuration management procedure. This tool is developed using Ruby DSL (domain-specific language). Puppet tool deploys, configures, and manages the servers.

Architecture

Read More »

Establish Connection between MySQL and Apache in a Containerized Web Application

This blog is the continuation of the previous blog of build a Containerized Web Application on Azure (Click here to read the previous blog) . In this blog, we will establish a connection between mysql-container and apache-container.

Now watch those containers with this command:

watch 'sudo docker ps -a'

If mysql-container stops then restart it using following command:

sudo docker start mysql-container

Open the mysql-container shell using the following command and check the status of the mySQL service.

sudo docker exec -it mysql-container bash
service mysql status

If MySQL service is not running then start it using the following command:

service mysql start

We have installed the network tools in the apache-container. Now install the network tools in the mysql-container.

apt install inetutils-ping net-tools -y

Checking Connection

Check network cards in the mysql-container.

ifconfig

And note down the IPaddress of the mysql-container and exit from this container and move to host machine. In my case, It is 172.17.0.2.

Read More »

Build a Containerized Web Application on Azure

In this blog, I am going to setup MySQL server in one container and apache2 in other container and If you are not familiar with Docker, read my this blog first(Click here to read the blog). Moreover, this all will be done on Azure virtual machine, If you are not familiar with Azure virtual machine, please read my this blog first to create the virtual machine on Azure(Click here to read the blog).

Setting Up Docker

To install Docker, use the following command:

sudo apt install docker.io

To start docker, command is given below:

sudo systemctl start docker

To start docker, when you start the ubuntu use this command:

sudo systemctl enable docker

To view current images, use the following command:

sudo docker images

To pull images, use the following command:

sudo docker pull ubuntu

Creating MySQL Container

We have already downloaded the ubuntu images. Now using this ubuntu image we will create the container and named it mysql-container. Because we are going to install MySQL database in it.

sudo docker run --name mysql-container -it ubuntu

Now you are in mysql-container, execute the following comand to set the environment and install the vim for editing.

apt update
apt install vim -y
exit

If you want to see which container in running on your host machine use this command:

Read More »

Flask Website Deployment using Docker Compose on Azure Cloud

In this blog, I will deploy FLASK app on nginx using Docker Compose. If you don’t have any idea how Docker Compose works, read my previous blog first (Click here to read the previous blog).
Before we move to work, I will give you brief intro the things which I am going to use. I created a virtual machine on Azure Cloud Platform. If you don’t know, how to create virtual machine on Azure, go to my this blog create virtual machine easily with few simple steps (Click here to read the blog).
After creating virtual machine just ssh into your machine using simple command.

ssh halcyoona@40.114.31.5

Installation

To install Docker the in your virtual machine, type the command in terminal and press enter:

sudo apt install docker.io
sudo apt install docker-compose

Create a directory with the name of your app, like I am creating my_flask_app.

mkdir my_flask_app
cd my_flask_app

In this floder create two more directory with the nginx and flask. Nginx is entry point of the app, where we get request and then we redirect those request to flask app.

mkdir flask
mkdir nginx

Flask App Setting

Now move into flask directory and create python virtual environment but first install package that is required to create the virtual environment i.e venv first then create virtual environment using following command:

cd flask
sudo apt install python3-venv
python3 -m venv env

Now activate the environment with the simple command:

soure env/bin/activate

And then install flask and uwsgi.

pip install flask uwsgi

flask package is used to create the applications.
uwsgi is a Web Server Gateway Interface used to communicate to nginx server.

Read More »

Getting Started With Docker Compose

In this blog, I will discuss Docker Compose and basic workflow of Docker Compose. But if you don’t know any thing about Docker technology read my blog about Docker first.

Docker Compose, a tool for defining and running complex applications with Docker. With Compose, you define a multi-container application in a single file, then spin your application up in a single command which does everything that needs to be done to get it running.Docker Compose is mostly used as a helper when you want to start multiple Docker containers and don’t want to start each one separately using docker run. Docker Compose allows configuring and starting multiple Docker containers. All of that can be done by Docker Compose in the scope of a single host.

Docker Compose Workflow

There are three steps to using Docker Compose:

  • Define each service in a Dockerfile and this will create a container for this service.
  • Define the services and their relation to each other in the docker-compose.yml file. And how they are going to communicate to each other, all the rules are defined in this file.
  • Use docker-compose up to start the system. You have to use only this command to start the whole system.

Fast Update

When you change some file in one service i.e update the code or any other changes, you have to restart the docker-compose to reflect the changes but the important things is that, only those containers are going to build again whcih are updated. Compose re-uses the existing containers. Re-using containers means that you can make changes to your environment very quickly.

If you want to deploy a website using Docker Compose check out my blog on deployment (Click here to go to deployment blog).